Sunday, July 29, 2012

Scrapspace Part Deux

This is the first scrapspace I have had that had wall space. And oh! What a lot of things can be done with walls! Lots of inspiration out there but as I'd prefer to spend my money on scrap supplies, I have improvised.


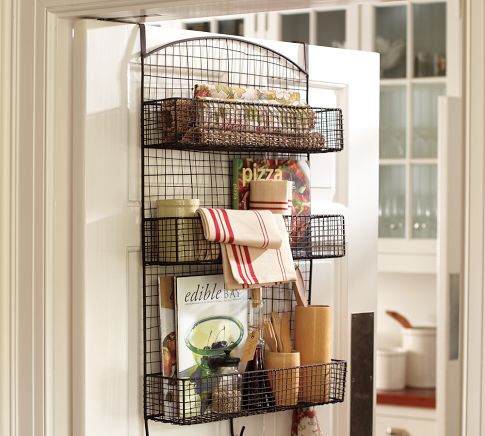
Technically NOT wall space, but I never had a door, either! Pottery Barn - love the look of this & the idea of utilitizing that space but $60? I don't really even think shelves are what I need but it looks so cool! Found this over-the-door towel rack lonely & forgotten in my mudroom:


How perfect! I thought hanging was the way to go for packs of embellis and even considered a clear hanging shoe storage bag, but this can accommodate a variety of sizes & has a high visibility factor which I need. For me out of sight is out of mind which is why it is so important that I carefully consider what is on display.

This was where I started with this part:
Had thought I would love to have an inspiration board on this wall until I saw this:


This was REALLY my heart's desire, but at $150 (ouch!) I paused... This isn't exactly in the style of my  pretty little room but I really loved the idea of showcasing some inspiration in my space. An email from Michaels  & their cube storage system at 50% off looked pretty tempting! And it fit on my sideboard with room left for my Big Kick.


Next I will have to deal with the closet (cue ominous organ music) so that I have shelving for the bins that are still downstairs, and a space for my sewing machine to stay set up - perfect!


Stay tuned!

Wednesday, July 25, 2012

To my 18 year old self

I had some helpful inspiration for this ScrapHappy Cookbook prompt, which I've credited on my Flickr post. I started out with a figure on the phone from the 9 to 5 October Afternoon line to represent my current self and a vintage (wow - I am really that old...) photo for my 18 year old self.

I chose the Basic Gray Lauderdale 6x6 paper pack for a patchwork background as it reminds me of retro style. I tried to chose more chaotic papers for the early days (top right).


Next I wanted to use the Jenni Bowlin numbered paper but it was going to overpower everything so it had to get trimmed back.


Then I cut some arrows marked on the back of plain green Lauderdale paper, then made the raw chipboard telephone into a glossy black one by inking and adding Ranger Glossy Accents. Don't mind the bubbles - a label will be added later on top with the year (intended to look like the phone number).


A phone needs a cord, but this one is brown, not black. 
Ink pad to the rescue again!


Number one lesson I wish I'd known as an 18 year old?
Put GOD first. Everything else just follows from that.

Decided that sentiment needed a little more pizzazz so created a little crown style accent with one of my first scrapbooking purchases - fancy edge scissors! I think I bought a tub of them, lol. I am surprised how often these come in handy, though, to add just a little something extra to a mat.


Time for a snack :~)


Then sew down the paper patchwork & arrows.


And there you have it.
The advice I would give ANYONE, young or old.


Saturday, July 14, 2012

Stamped Canvas Doily Embelli

It's so fun to be inspired by the tutorials at CKC  which took me here. I couldn't tell you more perfectly the how-to than Julia Stainton does, but I can show you my process! Our kit this month included a package of Amy Tan American Crafts canvas stickers, so I tossed in a sheet of sticky backed canvas in the hope of stealing this cute product.  I liked the doily shape & just so happened to have purchased these recently:

Good Tip: this stamp is a great choice as the pattern is rather bold & the stamp is cut deep, as I will be using paint to print the design. The paint can get a bit smudgy if the image is too fine & fussy.

So I gathered my supplies...

I bought the pack of canvas a few years ago & haven't ever used it! The paint dabbers are Sunshine Yellow, Lettuce & Pool. I have an entire drawer of paint but the convenience of the dabbers is wonderful for this project. There are stand alone dabbers available that slip over your finger, I believe, and could be used with your existing paint stash. Note to self to look for those!

So I load the stamp with paint:


Good Tip: clean that paint off right away! I used a ratty old utility brush that I keep handy for just such a job.


Distress the edges - why bother with the canvas if you can't tell it's fabric?


And voila!
Here's how I used one:

on this layout:


Tuesday, July 10, 2012

3 New Pages

Well, I knew when I put this latest CKC kit together it was going to challenge me. By staying true to the inspiration kit from Citrus Twist I will be thinking outside my usual scrapping box - A LOT!

The whole beach theme reminded me of this story so I dug up the photos & started playing. I had purposefully put the wooden house & boat embellis in my kit for this page, but didn't know where I would go from there. The blue chevron simply begged to be water & that inspired the little vignette on the right & the washi tape grounded it nicely. The stamp set came in handy to dress up the faded 70s photos even though it took a little nerve! Some zigzag stitching to anchor the waves (pun intended, hehe) & that little bite of a border punch detail finished it off.

So last night I get the first layout finished & I am still in a scrappy mood. These pics were on my desk to do a companion layout to this page of me w/my elder daughter as an infant next to a pic of her w/my grandson as an infant, where we are almost in the same position. Well, this is my husband with our younger daughter & our new granddaughter with her daddy! The original was a Polaroid so I cropped the other to mimic the shape & added the wooden Polaroid camera shape - perfect! Then I used my stencil page & yellow dabber to make the first half of the title, then fussy cut the bottom using the stencil again. A quick stamp from the set made a lacy accent for the girlie part & it's good to go. I really like how this turned out :~)

This morning when I finished the 2nd layout I was STILL motivated to scrap, so I started searching through my kit for inspiration. I decided to use the  October Afternoon chipboard as a starting point so I pulled out a photo album of pics from when the girls were young & found these. Doesn't that bike work so well on here? Kept adding here & there until my industrial accident - it didn't occur to me to add the yellow paint splatters (or at least that's what they were supposed to be, lol) until after most of the page was down. They were a little blobby but I could've lived with that. Unfortunately, I kind of forgot that they were still wet when I turned the page over to punch the little hands out of the bottom...uh-oh... As I can't come up with any camouflage ideas they will remain to mock me forever (just kidding!)

Wish I didn't have to stop to do boring things like laundry & housework & caregiving, but real life goes on! Thanks for joining me in the process :~)

Sunday, July 8, 2012

Oh my Glitz!

I am utterly breathless with this new sneak peek from Glitz shown here. Take a look at this!

 Please visit them & look at all the details. If you are into vintage funky Glitz goodness this will absolutely knock your socks off - sorry - your seamed stockings, lol! And the link has a giveaway if you comment by July 20th!

Well? GET GOING!!!

CKC July Counterfeit Kit "Beachy Keen"

Very grateful to be able to jump on board this month again :~)  So here's what I gathered up based on the inspiration kit "Summer Boardwalk" from Citrus Twist seen here.


And here's the formal presentation of my kit,
 "Beachy Keen"
(haha - I love figuring out more little blogging goodies 
as I explore some of the editing features!)


When choosing my papers the first four are about as close to cardstock/neutral/plain as I can go. I did include a sheet of white card but all others are patterned. I have been wanting to use that Jenni Bowlin stencil paper that is peeking out at #2, so watch for that to make an appearance.  

I also went a little off the reservation on my bolder patterned papers in the bottom row, but I chose things that mimicked the inspiration kit either in style of pattern or in the case of the green & the polka dots I really just wanted something lighter & brighter instead of more chevrons. There is a chevron stamp in the indie chic stamp set which I happened to have, plus I just bought a chevron border punch so that will get used as well.
 Here's a closer look at some of the details:


I had the stamp set found in the kit, but decided to substitute the Tin Pins, Smash arrows & tabs for the antique off-white buttons & the conversation bubbles, the pack of Prima flowers for a single, and the JB stamp for fun! You can also get a better look at the bottom row of my papers, minus the wood pattern.


Subbed different button pack & chipboard for the fabric stickers. I know myself so multiple alphas were a must! And I continue to reach for those tiny word stickers - so easy to do myself but I just never think of it.

My teal floss turned into lime green, my yellow ribbon turned into Sunshine Yellow paint dabber, floral tape into teal diagonal striped washi tape, and I chose a larger variety of wooden accents. Okay - I confess. In the process of putting my kit together I already have some photos in mind so I got a little specific with a few of my goodies!


All goes into the magic blue box, which will be my go-to supply bin for the month! I feel like this month I made the kit more my own than ever by being inspired but not trying to directly copy the inspiration. Couldn't be easier to grab some photos & get started :~)

And on another little blogging note - 
I can't believe how much daytime photography improves my pics! 
Will have to remember to be patient about posting until I can "get the light."

Sunday, July 1, 2012

Inspiration Strikes in the Strangest Places!

Just getting a little snack last night...


Why DO I love this shape so much?
Must. Go. Scrap. This. Shape :~)


 Or perhaps a lift of the back of the box?
Totally L-O-V-E this!